AI photo editing tools are becoming more and more present in the best photo editing software. To make things fun, I decided to edit a photo by only using AI tools. This meant I couldn’t use the standard adjustment sliders, do any manual color grading, or any other action that didn’t involve AI – now I’m sharing the results.
To do this experiment I decided to use Luminar Neo, a software I consider to be amongst the best AI photo editors. It has several AI tools from sky replacement, noise reduction, auto enhancement and more. I didn’t use every AI feature, as some of them are designed specifically for portrait photography, and in this test, I was editing a landscape shot.
I’ll take you through each step, offer my thoughts, and show you the end result.

I also made a video version if you prefer to watch.
Editing with an AI Photo Editor
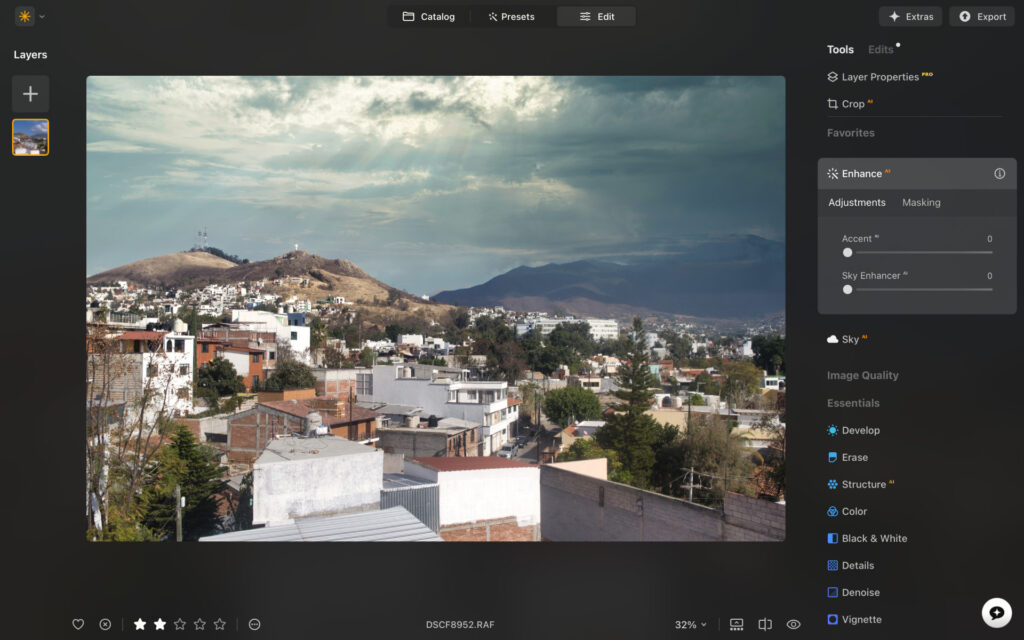
I took the below image on my rooftop in Oaxaca, Mexico. I’ll start with a screenshot of the RAW file. For those who are curious, I made the image with my Fujifilm X-T3 and a Viltrox 23mm f1.4.

Orginal RAW file.
Step 1: AI Enhancer
The AI enhancer makes global edits by assessing the frame and identifying where it can benefit from some adjustments. When I bumped up the slider to +75, I noticed clear changes to saturation, contrast, and there was some light depth added to the forefront and center of the frame. It’s a minor adjustment, but may be enough for super-light editors.

Step 2: Sky Enhancer
In my testing the sky enhancer did very little to improve the quality of the edit. Adjusting the slider to +25, I saw some subtle dehazing of the sky and the luminance of the blues were darkened.

Step 3: Sky Replacement
The sky replacement tool does what it suggests – it lets you swap out the sky. I actually like the original sky in the frame, but for the interest of the experiment I’ll change it to something Luminar Neo offers. There are plenty to choose from, and I landed on a sky that adds more clouds and some light rays, for a more dramatic effect.
Step 4: Structure
Structure is another term for clarity. In the case of the AI structure tool, rather than add or reduce clarity globally, it selects specific parts of the frame instead. AI detected both the sky and the trees, and I added a little more clarity to bring out the mid tones, then used the boost slider to make the luminance lighter.

Step 5: Twilight Enhancer
The twilight enhancer allows you to add specific moods to different parts of the frame. By using AI, I was able to auto select the mountains in the background of the frame.

Through a selection of presets, I then added a golden look to the frame, which I felt complimented the sunrays coming through the clouds. I noticed Luminar Neo under-exposed the mountains after applying the preset, but I was able to bump it back up through the exposure slider.

Step 6: Atmosphere
The Atmosphere tool adds fog or haze to the frame. Really, it’s just haze and I didn’t find the fog option to offer a realistic representation of what fog looks like. Still, I added some layered fog to the frame as I felt it brought up some highlights and detail in the middle of the image where the buildings were.

Step Seven: Magic Light
The Magic Light AI feature lets you add sun beams to your image. Personally, I find this feature a little cheesy, but that’s my personal preference. I know some photographers will welcome the ability to go a little further with the capabilities of the software.
I had to manually select where I wanted the light to fall, I did this with a brush tool. For this photograph it made sense to me to drop it on the peak of the mountain. It’s a little like adding a sun to the frame – again, not my favorite tool but I guess it added a little more flair to the shot.

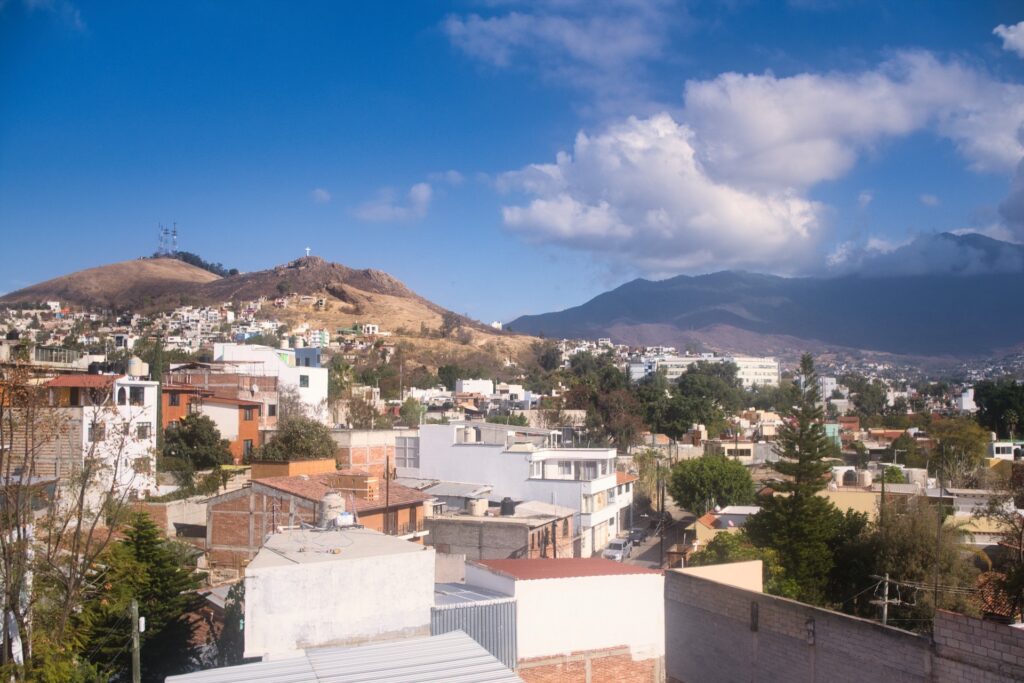
Before & After
Before we go into the final AI tool, I want to share a quick before and after of the image so far (I’ll explain why shortly).

Before

After
There’s no denying the seven AI tools have taken the image in a whole new direction. I like the subtle impact of the AI enhancement slider, and the Twilight enhancer was a fun feature too. I’d likely skip sky replacement, atmosphere, and magic light in my normal workflow, but I can’t deny they do add a creative edge to the frame.
Step Eight: AI Assistant
The AI assistant is the latest feature to come from Luminar Neo. It’s still in BETA, and will continue to improve as the software rolls out updates. The way it works is you write a prompt, telling the AI Assistant what edits you would like to make to the image. The assistant then rolls out three edits to choose from.
In my testing, I had to revert back to the original RAW file. The feature seemed to struggle when asking it to make edits to an image I had already worked on, and I got an error message. Also, the more complicated the prompt, the more it would struggle to make changes. So, for now, this is only suitable for basic edits.
My prompt:
“Add more saturation to the sky, increase the contrast slightly, brighten up the luminance of the trees.”

Below are the three options Luminar Neo’s AI Assistant presented, including the overview it gave of the changes.

Edit 1: The initial image showcases a vibrant cityscape with strong blue skies and mountainous terrain. To fulfill the user’s request for increased saturation and contrast, the Develop tool was utilized. Highlights were reduced slightly to prevent overexposure, while temperature was lowered to create a cooler tone. Shadows were boosted to reveal more detail in the darker areas, and exposure was increased to brighten the overall image. Contrast was significantly raised to enhance the visual impact of the scene.
Edit 2: Building upon the previous adjustments, the Enhance AI tool was employed to further amplify the image’s vibrancy. The Boost parameter was increased, and the Landscape tool was used to add a touch of glow, enhancing the luminosity of the trees. Supercontrast was applied with careful adjustments to highlights and shadows, creating a more dramatic range. A subtle glow effect was added to create a sense of depth and atmosphere, while the Dramatic tool was used to subtly reduce saturation, balancing the increased vibrancy.
Edit 3: To refine the image further, the Develop tool was used again, this time to deepen the shadows and lift the highlights, creating a more dynamic tonal range. The Structure AI tool was applied to sharpen details and improve the overall clarity of the scene. A gentle Glow effect was added to enhance the luminosity of the foliage, and Color Harmony was used to adjust the blue tones, ensuring a balanced and pleasing color palette. Finally, the Vignette tool was used to create a subtle darkening around the edges, drawing the viewer’s eye towards the center of the image.
As you can see, the AI Assistant did little in following my prompt and decided to go in its own direction. I actually think the results are good and this can be a fun, and quick way of getting several edits of the same image in just under a minute. Hopefully it can follow prompts better, and in greater detail as future updates are released.
Signing Off
Overall, I found using AI tools a fun and enjoyable way to edit an image. I wouldn’t surrender my whole workflow to AI, as I like to have that element of control over my frame. Thankfully Luminar Neo has plenty of non-AI tools to help edit the image exactly how I want.
I do think the tools were good overall, and for really creative photographers who aren’t locked into the constraints of standard image editing, you’re going to enjoy how far you can push the frame.
Do you welcome AI photo editors? Let me know in the comments. Also to learn more about the software, I encourage you to read my long-term Luminar Neo review.
If you’d like to sign up for Luminar Neo, make sure you use code THEMFRAMES10 to get a discount.
More reading: Luminar Neo vs Lightroom: Honest Comparison Before You Buy
Read our Affiliate Statement.